Homemade Black Walnut Ink11-8-2007
I recently began making my own black walnut ink for use in drawing. There are various recipes around the Internet, and all of them are similar.
This is a long process, but most of the time is devoted to waiting. Very little of it actually involves doing something.
The basic process for making black walnut ink is this: Get rotten black walnuts, husk and all. Boil the heck out of them. Strain the mess and use the brown juice for drawing or writing. That’s all there is to it, really, but I’m always game for elaborating…
Step 1. Find your walnuts. Black walnut trees are fairly plentiful here in Louisville, and that seems to be true for much of the eastern half of the U.S. In October, one can spot the green, leathery, round fruit (usually just a little smaller than tennis balls) on the ground or getting ready to fall. One doesn’t use them when they are green, however. Gather the blackest, rottenest, gunkiest ones you can find. If there aren’t any that are black and icky, gather the green ones. Gather the entire fruit. The small, hard shell with the nut in the center is a non-essential piece for the ink. What one needs is the leathery rind. Just pick up the whole thing.
 Newly gathered walnuts. Eat 'em? Naw! Get back, squirrels! I'm an artist!
(Warning: Black, oozy walnuts will stain hands and clothing, so use some caution.)
Step 2. Put them in a plastic bag and let them rot. The green ones will turn black over a few days or weeks.
(Another warning: At any step in this process, one can set all these walnuts aside. They are already rotten; it’s not like putting one’s ink-making on hold for days or even weeks will ruin the batch. If you store the walnuts outside, however, critters will be drawn to them. Squirrels will tear open bags and gnaw on pots.)
I refer to the walnuts in disgusting terms, and they are pretty gross. They get slimy and moldy, and you’ll probably find all kinds of strange little bugs living in them. Don’t worry. It all cooks down to the same brown sludge. Except for those little pale brown beetle larvae. They stayed shiny and intact even after hours and hours of boiling. If the ick factor is too high, just remember that you must suffer for your art. So must those with whom you share your kitchen.
Step 3. After they are black, put them in a large pot for which you don’t have any great affection. I used a large aluminum pot that we use very infrequently. I was surprised that, after I was done, the pot cleaned up very well; other sources, however, say that their pots and pans can become discolored. Stainless steel or enamel-coated pots seem to be the general recommendation, but my aluminum one worked just great.
Cover the walnuts with water and let them soak for at least a day. The longer they soak, the better. My first batch soaked for a day, and my second batch soaked for several days. I plan to make a third batch which I will allow to soak for several months.
(Another warning: The walnuts, water, and ink all have a high capacity for staining anything they come into contact with. This includes kitchen counters, fingernails, dishes, wooden spoons, and your clothing.)
Step 4. Dismantle the walnuts. Tear, mash, and break them up. The more little pieces one can get, the better. Remember, the rotten, black pulp material is the stuff that turns the water into ink.
With my first batch, I tore them up before I soaked them. With my second batch, I didn’t really break up the husks until they were cooking. Step 4 can kind of be inserted anywhere in the soaking step, or early in the cooking step (Step 5.)
Use this water, which at this point has started to turn black from the walnut juice, for the next step.

Step 5. With the walnuts still covered in their (now-blackened) water, put them on a medium-low heat. Let them simmer for a long time—hours. If the water gets too low, you can add more. The goal, though, is to let it slowly cook down.
Periodically, dip a brush into it and test the liquid on some paper to see how dark it is. Once the liquid is as dark as you want it, your ink is nearly done. It has probably cooked down quite a bit by this point.
The smell of the boiling walnuts is distinct, but not especially strong or unpleasant. It reminded me of rotten logs and damp forest.
Step 6. Let the dark brown mess cool for a while, and then strain it. The best method I’ve found so far is to stretch an old pair of nylons over a glass or plastic container, and pour the walnut sludge into it. Squeeze the sludge in the nylons to get as much liquid out of it as you can. Empty the walnut crumbs out of the nylons into the garbage (or your hedge, or compost heap, or your neighbor’s porch) and repeat until you’ve strained all the liquid into your container. Your container should now hold ink, free from all but small bits of sediment. This sediment, which will settle at the bottom of jars, shouldn’t be a problem. I tried letting the muck drain through coffee filters. I don't recommend it. It was painfully slow and messy.
 A page from my sketchbook, where I was testing and playing with the walnut ink.
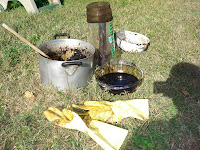 Straining the ink. I put an old pair of nylons over the opening of a large plastic can that pretzels came in. After I filled it partially with walnut sludge, I pulled it out and squeezed it over the glass bowl. By the time I was done, the glass bowl was nearly full of the ink.

Step 7. You might want to add a preservative, since the ink can grow mold. The best recommendation I’ve heard so far is to add a small amount of denatured alcohol (add it so that it constitutes 5% of the ink). Salt would also work, but salt can lead to corrosion in metal pen nibs. Vinegar also can retard mold and bacterial growth, but its acidity renders the ink non-archival.
Optional: Most black walnut ink makers recommend the addition of gum arabic to improve the ink’s flow.
Results so far:11-8-07: After a couple of batches homemade black walnut ink, I am unsatisfied with the ink’s darkness. I tried taking a couple of jars and boiling them down further, and the ink did become more concentrated. The ink also became a little thicker and didn’t flow as well. This might be where the gum arabic would come in handy, but I haven’t bought any yet. A 2 ½ jar at the art store runs about twelve dollars. If I had that kind of money, I wouldn’t be making my own ink! Heh heh. I may try buying some powdered gum arabic on Ebay.
Even though the ink isn’t as dark as I’d like, it still is pretty nice. I think I might be able to make the next batch darker by letting the walnuts soak a lot longer—months, instead of days.
I am also running a lightfastness test with the ink on the dashboard of my car.
I will edit this post periodically as I learn more.
2-7-2012: I guess I should add another update. A couple of months ago I made another batch of ink from walnuts that I had sitting in a pot in my garage for about two years. Or was it three? Anyway, they were sitting covered in water for a very long time. I've read that there are chemicals in walnuts that discourage mold growth, and that must be true, for there was no mold in the walnuts. (Then why does the ink grow mold, I wonder?)
These walnuts had also been soaking with some old nuts and bolts to add some iron content, on the theory that it would darken the ink. I don't kow whether it was this iron, or the age of the walnuts, or a combination of the two, but the ink came out noticeably darker than previous batches.
6-27-13: Another brief update. I am still using ink from previous batches and have not made any ink since that mentioned in the update above. But to elaborate on the above point, I recently had four drawings side-by-side: three done with the newest batch of ink, which had very aged walnuts as well as rusty metal added to the mix, and one drawing done with an older batch that had not sat around soaking as long and which had not metal in it.
The first three were brown, but were more of a charcoaly brown, whereas the the one had more of a burnt sienna appearance.
My goal had been to make a darker ink, but comparing them, I think I actually like the browner one more. It just has a more vibrant feel.
I recently began making my own black walnut ink for use in drawing. There are various recipes around the Internet, and all of them are similar.
This is a long process, but most of the time is devoted to waiting. Very little of it actually involves doing something.
The basic process for making black walnut ink is this: Get rotten black walnuts, husk and all. Boil the heck out of them. Strain the mess and use the brown juice for drawing or writing. That’s all there is to it, really, but I’m always game for elaborating…
Step 1. Find your walnuts. Black walnut trees are fairly plentiful here in Louisville, and that seems to be true for much of the eastern half of the U.S. In October, one can spot the green, leathery, round fruit (usually just a little smaller than tennis balls) on the ground or getting ready to fall. One doesn’t use them when they are green, however. Gather the blackest, rottenest, gunkiest ones you can find. If there aren’t any that are black and icky, gather the green ones. Gather the entire fruit. The small, hard shell with the nut in the center is a non-essential piece for the ink. What one needs is the leathery rind. Just pick up the whole thing.
 Newly gathered walnuts. Eat 'em? Naw! Get back, squirrels! I'm an artist!
(Warning: Black, oozy walnuts will stain hands and clothing, so use some caution.)
Step 2. Put them in a plastic bag and let them rot. The green ones will turn black over a few days or weeks.
(Another warning: At any step in this process, one can set all these walnuts aside. They are already rotten; it’s not like putting one’s ink-making on hold for days or even weeks will ruin the batch. If you store the walnuts outside, however, critters will be drawn to them. Squirrels will tear open bags and gnaw on pots.)
I refer to the walnuts in disgusting terms, and they are pretty gross. They get slimy and moldy, and you’ll probably find all kinds of strange little bugs living in them. Don’t worry. It all cooks down to the same brown sludge. Except for those little pale brown beetle larvae. They stayed shiny and intact even after hours and hours of boiling. If the ick factor is too high, just remember that you must suffer for your art. So must those with whom you share your kitchen.
Step 3. After they are black, put them in a large pot for which you don’t have any great affection. I used a large aluminum pot that we use very infrequently. I was surprised that, after I was done, the pot cleaned up very well; other sources, however, say that their pots and pans can become discolored. Stainless steel or enamel-coated pots seem to be the general recommendation, but my aluminum one worked just great.
Cover the walnuts with water and let them soak for at least a day. The longer they soak, the better. My first batch soaked for a day, and my second batch soaked for several days. I plan to make a third batch which I will allow to soak for several months.
(Another warning: The walnuts, water, and ink all have a high capacity for staining anything they come into contact with. This includes kitchen counters, fingernails, dishes, wooden spoons, and your clothing.)
Step 4. Dismantle the walnuts. Tear, mash, and break them up. The more little pieces one can get, the better. Remember, the rotten, black pulp material is the stuff that turns the water into ink.
With my first batch, I tore them up before I soaked them. With my second batch, I didn’t really break up the husks until they were cooking. Step 4 can kind of be inserted anywhere in the soaking step, or early in the cooking step (Step 5.)
Use this water, which at this point has started to turn black from the walnut juice, for the next step.

Step 5. With the walnuts still covered in their (now-blackened) water, put them on a medium-low heat. Let them simmer for a long time—hours. If the water gets too low, you can add more. The goal, though, is to let it slowly cook down.
Periodically, dip a brush into it and test the liquid on some paper to see how dark it is. Once the liquid is as dark as you want it, your ink is nearly done. It has probably cooked down quite a bit by this point.
The smell of the boiling walnuts is distinct, but not especially strong or unpleasant. It reminded me of rotten logs and damp forest.
Step 6. Let the dark brown mess cool for a while, and then strain it. The best method I’ve found so far is to stretch an old pair of nylons over a glass or plastic container, and pour the walnut sludge into it. Squeeze the sludge in the nylons to get as much liquid out of it as you can. Empty the walnut crumbs out of the nylons into the garbage (or your hedge, or compost heap, or your neighbor’s porch) and repeat until you’ve strained all the liquid into your container. Your container should now hold ink, free from all but small bits of sediment. This sediment, which will settle at the bottom of jars, shouldn’t be a problem.
 I tried letting the muck drain through coffee filters. I don't recommend it. It was painfully slow and messy.
 A page from my sketchbook, where I was testing and playing with the walnut ink.
 Straining the ink. I put an old pair of nylons over the opening of a large plastic can that pretzels came in. After I filled it partially with walnut sludge, I pulled it out and squeezed it over the glass bowl. By the time I was done, the glass bowl was nearly full of the ink.
Step 7. You might want to add a preservative, since the ink can grow mold. The best recommendation I’ve heard so far is to add a small amount of denatured alcohol (add it so that it constitutes 5% of the ink). Salt would also work, but salt can lead to corrosion in metal pen nibs. Vinegar also can retard mold and bacterial growth, but its acidity renders the ink non-archival.
Optional: Most black walnut ink makers recommend the addition of gum arabic to improve the ink’s flow.
Results so far:11-8-07: After a couple of batches homemade black walnut ink, I am unsatisfied with the ink’s darkness. I tried taking a couple of jars and boiling them down further, and the ink did become more concentrated. The ink also became a little thicker and didn’t flow as well. This might be where the gum arabic would come in handy, but I haven’t bought any yet. A 2 ½ jar at the art store runs about twelve dollars. If I had that kind of money, I wouldn’t be making my own ink! Heh heh. I may try buying some powdered gum arabic on Ebay.
Even though the ink isn’t as dark as I’d like, it still is pretty nice. I think I might be able to make the next batch darker by letting the walnuts soak a lot longer—months, instead of days.
I am also running a lightfastness test with the ink on the dashboard of my car.
I will edit this post periodically as I learn more.
2-7-2012: I guess I should add another update. A couple of months ago I made another batch of ink from walnuts that I had sitting in a pot in my garage for about two years. Or was it three? Anyway, they were sitting covered in water for a very long time. I've read that there are chemicals in walnuts that discourage mold growth, and that must be true, for there was no mold in the walnuts. (Then why does the ink grow mold, I wonder?)
These walnuts had also been soaking with some old nuts and bolts to add some iron content, on the theory that it would darken the ink. I don't kow whether it was this iron, or the age of the walnuts, or a combination of the two, but the ink came out noticeably darker than previous batches.
6-27-13: Another brief update. I am still using ink from previous batches and have not made any ink since that mentioned in the update above. But to elaborate on the above point, I recently had four drawings side-by-side: three done with the newest batch of ink, which had very aged walnuts as well as rusty metal added to the mix, and one drawing done with an older batch that had not sat around soaking as long and which had not metal in it.
The first three were brown, but were more of a charcoaly brown, whereas the the one had more of a burnt sienna appearance.
My goal had been to make a darker ink, but comparing them, I think I actually like the browner one more. It just has a more vibrant feel.
Thanks for putting this up, also, I have been somewhat addictedly watching Babylon 5 too. I have a bunch of black walnuts in a bag that I was going to eat, but now... hmmmm
ReplyDeleteDo you feel differently working with ink you made yourself as opposed to paint or ink you buy? Are you more proud, frustrated, curious, etc? Very, very fascinating. By the way, if my nieces are as talented (which I'm sure they already are) as they are cute, this world's in for a heep of trouble.
ReplyDeleteI don't yet understand my feelings about using ink that I made. I think I am more proud, and it's fun to know that I have connections to the images I create than run deeper than before. Plus, doing drawings of trees with ink made from their fruit has a certain joyful circularity.
ReplyDeleteAlso, a very important factor is that making your own ink is much, much cheaper than buying it at an art store. Self-sufficiency is a nice goal for someone who operates in the red.
Ok now I get it! Instead of throwing them out next year...I'm making ink! Maybe I wont have so many squirells next fall
ReplyDeleteThanks for posting this! I just read on another site to add rusty nails to the walnuts. The iron in them reacts and makes a much darker ink that gets even darker as it dries (oxidizes in the air).
ReplyDeleteI am getting ready to start the process of straining my own batch. I have a potful of juice ready to work with. it has been sitting on my back porch since first of January. but my question is...what am I going to do with a gallon of ink!!!
ReplyDeleteHi Mark - thanks for posting this. I don't have the squirrel problem here i the land down under [not sure how the kangaroos will react though!]Getting my hands on walnuts today so looking forward to the process. By the way... how's your neighbour's porch? :D
ReplyDeleteThanks for the comments. Indy, good luck with your ink. I like all my neighbors, so I've resisted the urge to leaves messes. And ReBorn Again: I added rusty bolts to my last batch, which sat in my garage in water for a full year (maybe two, I'm not sure) before I boiled it, and it did seem blacker.
ReplyDeleteThe first and only time I've made Walnut Ink, I made five gallons of it, and had a field day giving it away as gifts on special occasions to my friends and family. I used instructions which were identical to yours here and the ink turned out fabulous. During the cooking process though, I slowly boiled my hulls whole for three days, and the ink was dark and thick. Today, five years later, after adding salt and denatured alcohol, it has not molded once and it writes a medium brown. I posted your page to my facebook page to hopefully get folks interested in this time honored and worthy project. Thanks so much for doing what you do and sharing it!!!
ReplyDeleteThank you for posting your recipe, it's the exact one that I used five years ago when I made a five gallon batch of Walnut Ink. The only thing I did differently was let the green hulls sit in the water for a week outside on the back deck (boy did it stink), then I gently boiled the mess for three days, making thick and dark ink (That stunk worse than when dehydrating mushrooms, and to my husband's disagreement, I did it in the house). After five years, the ink hasn't molded once and it still writes medium brown. Also, love your sense of humor here in this write up...many thanks!
ReplyDeleteMy facebook page is San Petty, thanks so much :)
thanks im going to try it....curious...gathered some walnuts here in spain
ReplyDelete